Finally, after much wait, I laid my hands on the new Amazon Kindle Fire which is based on a customized Android 2.3.4.

It is cool for Amazon to pack the kindle into a well cushioned parcel box sealed for overseas shipment.

Unboxing the Kindle FIre is very straightforward. Similar to Apple products, there is no complicated mess of guides and accessories. Just the Kindle device and the power adaptor.


The Kindle Fire is very similar to Blackberry Playbook in looks but with similar configuration to that of a Samsung Tab 7″. With exception that it is a WiFi without any call capability.
As usual, one of the key interest for many is to root the Kindle Fire so that you can install all the applications which you can find in the regular Android Market instead of the restrictive Amazon App Store. That said, the warranty of the Kindle will be void once the device is rooted, akin to jailbreaking any iOS device.
Here are the steps to root the Kindle Fire using a regular Mac:
Step 1. Go to Settings->More->Device and make sure “Allow Installation of Applications” is checked “ON”.
Step 2. Connect your Kindle Fire to your computer via micro-USB cable. And hit “Disconnect” to turn off the USB disk drive mode.
Step 3. Download KindleFireRootMacLinux.zip and unzip to the root directory of your hard disk such as c:\KindleFireRoot. Download KindleFireRootMacLinux.zip
Step 4. Open up a terminal.
Step 5. Browse to the KindleFireRootMacLinux directory by typing:
cd Downloads/KindleFireRootLinux
Step 6. Type:
mkdir ~/.android
cp adb_usb.ini ~/.android/.*
Step 7. Type:
./adb-mac kill-server
./adb-mac devices
If you get a bunch of numbers and letters, that means you are good to go.Step 8. Type:For Mac:sh runmemac.shStep 9. Your Kindle Fire should do its rooting and reboot.
You can verify you have SuperUser app by going to Settings->More->Applications->All Applications.
Next, once the Kindle Fire is rooted, you can install the Android Market by following these steps:
Step 1: Obtain the follow files:
– Google’s com.amarket.apk
– GoogleServicesFramework.apk
– Root Explorer apk file (or alternative file explorer app you’ll be using)
Step 2: Using Root Explorer to the GoogleServicesFramework
Step 3: Install GoogleServicesFramework and install it.
Step 4: Using Root Explorer, browse to location for Google’s com.amarket.apk
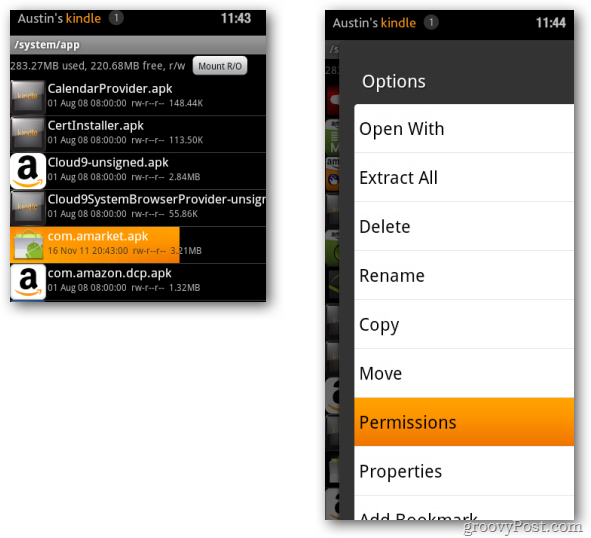
Step 5: Tap and hold over com.amarket.apk. An options window will appear over it. Tap Move (this is the same thing as Cut).
Tap the … Parent folder button twice. It is located at the top of the window.

Step 6: You should now be in the root (top directory) of your Kindle Fire. From here browse to /system/app/.
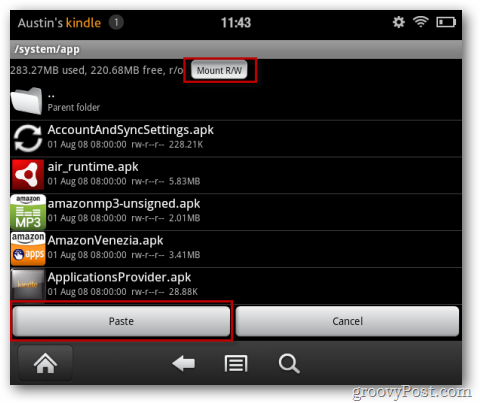
In /system/app/ click the Mount R/W button at the top of the screen. This will make the directory writable so you can paste in the Google Market app.

Step 7: Next, tap Paste.
The market app we moved is now in your system/app/folder. Tap and hold over it to make the options window appear. From the options list, tap Permissions.
Set the permissions so they match exactly to the screenshot below. You’ll notice that most of the other apps in this directory have the same permission settings. The typological version of this would be rw-r—r—.Note: Failure to set permissions properly before installing the market apk will result in the market force closing forever.
Step 8:
With permissions properly set, tap com.amarket.apk and install it.
Once installation is complete, power off your Kindle and then power it back on again.
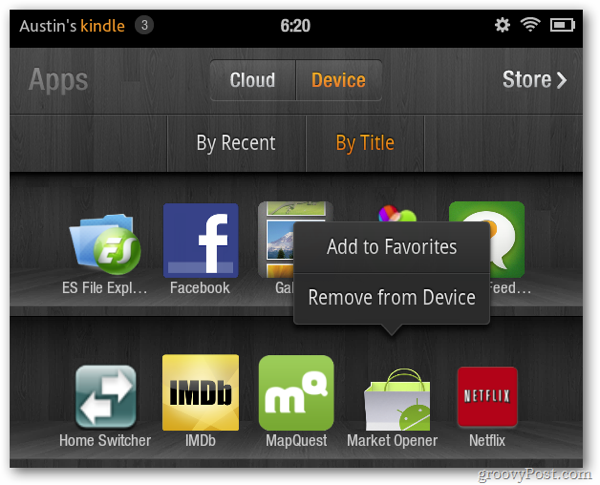
The Android Market is installed and working on your device. The only problem is, accessing the market is extremely difficult since Amazon’s UI does not allow it to show up in the app list or carousel. But that can be changed.Use the built-in web browser go to this link – http://munday.ws/kindlefire/MarketOpener.apk to download Munday’sMarket Opener app. Then, open up ES File Explorer and install the MarketOpener.apk from the /sdcard/download/ folder.
Once installed, MarketOpener will show up in the app list on your Kindle Fire. Add it to your favorites so that it shows up on your home screen. It will show up in the carousel as well.

With the rooted Kindle Fire, the Amazon Launcher can be replaced with Go Launcher (found in Android Market).
Before:

After:

Below are the links to the required files:
https://blog.alansoon.com/wp-content/uploads/2011/Adhoc/KindleFireRootMacLinux.zip
https://blog.alansoon.com/wp-content/uploads/2011/Adhoc/MarketOpener.apk
https://blog.alansoon.com/wp-content/uploads/2011/Adhoc/Root_Explorer_v2.17.1.apk
Read other related posts:
Follow us on:
Share this article on:

